You are not logged in.
- Topics: Active | Unanswered
#51 Re: Help and Support » NanoDLP Crashing » 2017-05-22 08:43:08
#!/bin/bash
touch /var/log/printer.log
chmod 644 /var/log/printer.log
/usr/local/bin/pigpiod -s 10
sleep 5
clear
setterm -cursor off
(cd /home/pi/printer;./printer >> /var/log/printer.log 2>&1)
#52 Re: Tips, Tricks and Tutorials » Adventures in Dynamic Cure Times » 2017-05-21 01:25:49
the real layer
#53 Re: Tips, Tricks and Tutorials » Adventures in Dynamic Cure Times » 2017-05-21 01:05:48
look at this the pixxel dimming effect on 30µm pixel size
this wall has .300µm thick
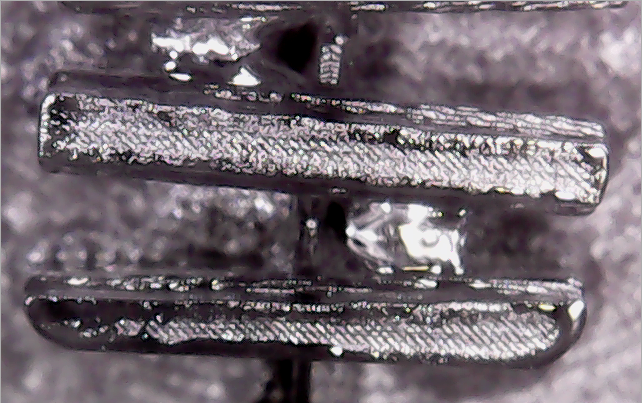
#54 Re: Tips, Tricks and Tutorials » Adventures in Dynamic Cure Times » 2017-05-21 00:54:56
Hello Mr.Carletto,
the size of the part is about 4mm x 4mm with 34µ pixel size and 25µm layers, its a micromechanic part, its like a table desk, exactly as you guessed, as nanodlp (thank god!) works with pulses and velocity is µm/sec i had set it to 200µm/sec on slow section...
#55 Re: Tips, Tricks and Tutorials » Adventures in Dynamic Cure Times » 2017-05-19 10:11:50
before overcure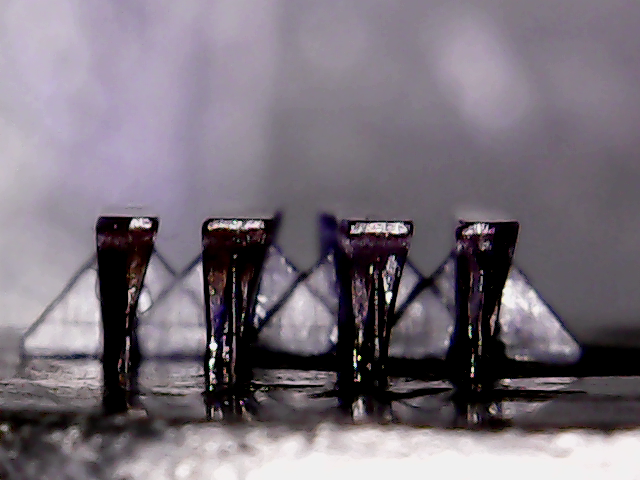
#56 Re: Tips, Tricks and Tutorials » Adventures in Dynamic Cure Times » 2017-05-19 10:06:31
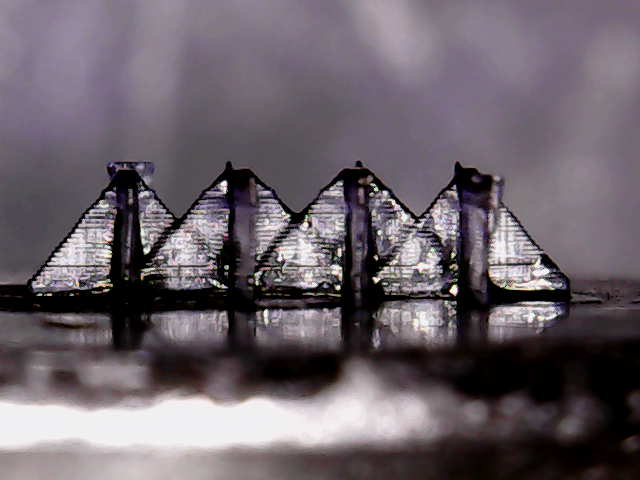
Overcure !!!

#57 Re: Tips, Tricks and Tutorials » Adventures in Dynamic Cure Times » 2017-05-19 08:54:50
first test
section 1 ,2 ,3
burn in , suport', suport", and the peak
burn in 100µ
suport 25µ
#58 Re: Tips, Tricks and Tutorials » Adventures in Dynamic Cure Times » 2017-05-18 23:36:04
you can try using this template, substituting your own values for the place holders. This should be a fair starting point and replicates a similar function to how Kudo3Ds determines cure time by layer height.
{(
(([[LayerNumber]]<=21)*Burn_in_Cure_Time)+
(([[LayerNumber]]>=22)*Support_Cure_Time*([[LayerNumber]]<=35))+
(([[LayerNumber]]>=36)*Detail_Point_Cure_Time*([[LayerNumber]]<=40))+
(([[LayerNumber]]>=41)*Layer_Cure_Time)
)}
if you want to use a formula for calculating who long you should cure based on area you'll need to do some experimentation.
first check to see how long it takes to cure a small area (5 mm x 5 mm for example) then check to see how long it takes to cure a much larger area ( 15 x 15, maybe).
if you can provide me with observed cure times and size of cured slices I can whip up a formula for you like I showed above.
Im working with values around 1sec exposure at 25µm i even try to reduce the layers to 10-5µ with shorter exposition time to prevent overcure and adj. the grayscale, i will perfom another test table to be more assertive with values envolved.
as we know the cure depth formula, Cd(curedepth) = Dp(depth penetration) * ln E(lamp or average exposure dosed by source lamp led) / Ec(critical exposue)
as Dp and Ec are constants defined by Resin formulation kinectics,
I spent months adjusting concentration of reactive diluents and initiators/ inibitors trying to adjust resolution in resin, working with very viscous transparent reesin seems to be more challenge than i thought
i experiece overcure with this stuff
But i belive this formulas will ramp up the issues envolved, i will perform th test and came back to tell waht i got.
Thank you guys it will help me a lot.
#59 Re: Tips, Tricks and Tutorials » Adventures in Dynamic Cure Times » 2017-05-18 18:22:44
1125lbs wrote:I have an issue with how to write the formulas for this especific part, i divided the printing process on 5 steps, i need to adjust the formulas, our fellows could help me with some example? thanks
what are you going to base splits on? layer position, current height, LargestArea, SmallestArea, something else?
I can write out a couple of templates if you give me an idea of how you want it broken up.
Hello jcarletto27,
A client came to me with a model which is has very tiny features, the model s 5mm tall with inner mechanisms, so i have already positioned in every config possible with no success,
im running experiements with transparent viscous material, and i believe overcure is the key...
let me try to explain in simple way
from layer 0 - 21 still ok same thick or [TotalSolidArea]
from layer 23-35 the suports features start to get sharp, so [smallest_area] decrease <<< need to rise exposure time as Smallest area decrease at this point
from layer 35-37 parts start to be drawed but still thin points, the part geomeri has a dome base so in center still some suports, which i consider by inspection after slice the " Critical Smallest Area " until here.
from layer 37-... i would like to calc exposition based on largest Area or pixel diff. ( i will trig the pixel dimming at this point )
any example just to mind me how to handle the functions inside the nanodlp would be helpfull, im have difficult how to deal with arguments and mensages,
Let me clear, i see on layer preview all features as Area count, total solid area, largest area. smallest... its very cleaver and extremely necessary to define a strategy used, like preserve xy projection or maintain are for support how compensate thing to became printable when working with very thin details stuff
im running with pi3 witth direct control mode
best regards
#60 Re: Tips, Tricks and Tutorials » Adventures in Dynamic Cure Times » 2017-05-18 07:19:06
I have an issue with how to write the formulas for this especific part, i divided the printing process on 5 steps, i need to adjust the formulas, our fellows could help me with some example? thanks
#61 Re: Tips, Tricks and Tutorials » Adventures in Dynamic Cure Times » 2017-05-18 07:15:47
Shahin wrote:Sorry my last message was not clear enough.
For some reason slicer has been recorded [[LargestArea]] value as zero for your SLC file. As you have division by [[LargestArea]] in your formula. It returns wrong value.
Shahin -
jcarletto27 and I have been working on some dynamic cure stuff via email. It seems to me from our experiments that it may be beneficial to have a few extra keywords in regards to the layer areas, such as smallest area, or average area.
I'm not sure of exactly how it would work, but I'm thinking with the right processing and cure formula, we may be able to implement truly dynamic cures kind of like how the resin test pillars work. The idea would be to maybe sort pieces of the current slice into categories, [small] [medium] and [large] I'm sure would be fine and then specify known good cure times for those ranges of sizes. The printer could then display the entire slice for the duration specified by [small], turn off the [large] category first, then the [medium], then the [small], then move to the next layer.
Is that workable? Or am I dreaming?
it would be a dream! im trying to print a complex very tiny part with capilar structures and some restriction from part, i have found the same method would work for me as Smallest area = threshold of critical smallest suport area, then cure exposition riseup smallest area increase,
#62 Re: Feature Requests » Preview Plate layers on printer LCD » 2017-05-16 04:24:18
yes, i had updated thank you, but there's a issue, it do not turn off unitl i get the projector calibration tab and press any close button,
#63 Re: Feature Requests » Preview Plate layers on printer LCD » 2017-05-15 03:03:49
I am not sure how it could be useful but will add it.
Hi Shahin would you add the preview button ( just the same in calibration's plate?
thnx
#64 Re: Feature Requests » Alternate projection » 2017-04-27 22:43:35
Could you try make such plate manually and compare the result? (create two plates one with !00% dimming another one without. Export plates and mix layers from the two plate.
On materialise Magics you could generate this kind of support
#65 Re: Feature Requests » Preview Plate layers on printer LCD » 2017-04-22 10:39:54
i would also request this option
#68 Re: Feature Requests » Raspberry Pi3 + Display touch 7" » 2017-03-19 01:49:18
to be more specific how i swap monitor output, i need to set projection screen thru hdmi output
#69 Feature Requests » Raspberry Pi3 + Display touch 7" » 2017-03-18 18:16:17
- 1125lbs
- Replies: 5
Hi fellows,
I just install the image on sd, i would like to know how i enable the touch display, anyone could help ?