We released the Pi 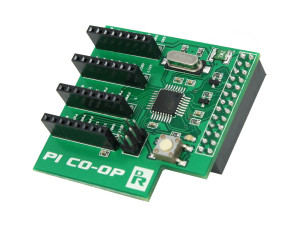 Co-op, an Arduino add-on board for the Raspberry Pi back in the middle of January. But for various reasons, we haven’t had the time to do much promotional work, and explain to people why it’s so cool, and why you’d actually want to add an Arduino to your Pi.
To fix that, we’ve created a video, because reading text can be really boring ![]() , and then, we’ve written this blog post to show you one of the really useful things you can do with the Pi Co-op. We show you how you can use your Pi Co-op as a general purpose I/O board for the Pi.
, and then, we’ve written this blog post to show you one of the really useful things you can do with the Pi Co-op. We show you how you can use your Pi Co-op as a general purpose I/O board for the Pi.
So now, instead of having to buy loads of different add-on boards for your Pi, you can just buy the Pi Co-op here. ![]() You can use it as an Analog to Digital Converter (ADC), you can use it to connect to 5V devices, you can use it to generate PWM signals, and you can use it for I2C. To top it all off, you can also control all of this functionality from a high level language such as Python.
You can use it as an Analog to Digital Converter (ADC), you can use it to connect to 5V devices, you can use it to generate PWM signals, and you can use it for I2C. To top it all off, you can also control all of this functionality from a high level language such as Python.
Getting Started
It’s very easy to set up your Raspberry Pi to work with the Pi Co-op. Full details are provided in the manual, but as a quick recap, these are the steps you need to follow in Raspbian.
Open up a terminal window and run the following commands
sudo apt-get update
sudo apt-get install arduino git
This will install the Arduino IDE and some supporting Python libraries. Now run the following commands
git clone https://bitbucket.org/DawnRobotics/pi_co-op.git
cd pi_co-op
sudo python setup_pi_co-op.py install
This will alter configuration files to allow us to use the serial port on the GPIO pins of the Pi. Finish the configuration by restarting the Raspberry Pi
sudo reboot
If everything goes well, then you will now be ready to start programming the Pi Co-op.
Installing PyMata
To use the Pi Co-op as a general purpose I/O board we make use of a project called Firmata. Firmata is a program for an Arduino (the Pi Co-op is compatible with an Arduino Uno) that allows you to control all of its functionality using serial communication. The reason for doing this is, if you have a library that speaks the correct serial protocol with Firmata, then you can control the Pi Co-op with any language you want, and you don’t have to program it directly!
The Firmata Github page contains links to client libraries for most languages. For example there are libraries for Python, Javascript, Ruby and the .NET Framework, to name but a few. To show how this works, for this post we’re going to use Python and a library called PyMata. PyMata is an open source library that was written by Alan Yorinks. We’ve extended PyMata slightly so that it can also use a tool called Ino to automatically program the Pi Co-op with Firmata, if needed.
To get started with the installation. Open up a terminal window and enter the following
sudo apt-get update
sudo apt-get install python-pip python-dev python-serial
sudo pip install tornado ino
Now install PyMata by entering
git clone https://github.com/DawnRobotics/PyMata.git
cd PyMata
sudo python setup.py install
Blinking an LED with PyMata
The classic ‘Hello World!’ program to run on an Arduino is to blink an LED. The Pi Co-op has an LED so you can get it to start blinking by executing the following Python code on the Pi.
import time

from PyMata.pymata import PyMata

# Pin 13 has an LED connected on most Arduino boards.
# give it a name:
LED = 13

# Create an instance of PyMata.
SERIAL_PORT = "/dev/ttyS0"
firmata = PyMata( SERIAL_PORT, max_wait_time=5 )

# initialize the digital pin as an output.
firmata.set_pin_mode( LED, firmata.OUTPUT, firmata.DIGITAL )

try:
    # run in a loop over and over again forever:
    while True:

        firmata.digital_write( LED, firmata.HIGH ) # turn the LED on (HIGH is the voltage level)
        time.sleep( 1.0 ) # wait for a second
        firmata.digital_write( LED, firmata.LOW ) # turn the LED off by making the voltage LOW
        time.sleep( 1.0 ) # wait for a second

except KeyboardInterrupt:

    # Catch exception raised by using Ctrl+C to quit
    pass

# close the interface down cleanly
firmata.close()
When you run this program, if Firmata is already installed on your Pi Co-op then you should just see a short bit of connection text and the LED on your Pi Co-op should start blinking.
If Firmata isn’t installed on your Pi Co-op then you will see lots of text scroll past as PyMata compiles the Firmata code and uploads it to the Pi Co-op. This does take a little bit of time, but don’t worry, the next time you run the script, the connection process will be a lot quicker. Also, the compiled Firmata is cached, so that if you upload a different Arduino sketch to your Pi Co-op, then the next time you use PyMata it will just upload the already compiled version.
Code Explanation
Hopefully, if you’re familiar with the Arduino Blink sketch then the PyMata LED blink code should be fairly self explanatory. The important bits are
# Create an instance of PyMata.
SERIAL_PORT = "/dev/ttyS0"
firmata = PyMata( SERIAL_PORT, max_wait_time=5 )
This creates an instance of the PyMata class to connect to Firmata on the given serial port. The parameter max_wait_time specifies the time to wait in seconds when trying to connect to Firmata, before giving up and starting the upload process.
# initialize the digital pin as an output.
firmata.set_pin_mode( LED, firmata.OUTPUT, firmata.DIGITAL )
This line sets the LED pin as a digital output
        firmata.digital_write( LED, firmata.HIGH ) # turn the LED on (HIGH is the voltage level)
        time.sleep( 1.0 ) # wait for a second
        firmata.digital_write( LED, firmata.LOW ) # turn the LED off by making the voltage LOW
        time.sleep( 1.0 ) # wait for a second
Finally, these lines which form the body of the while loop, cause the LED pin to be written HIGH and then LOW in order to flash the LED pin.
Running the Other Examples
We’ve written a number of example scripts for using the Pi Co-op with PyMata, and put them in the examples folder of the Pi Co-op repository. The example we’ve just discussed is called pymata_blink.py, and there are also examples for reading from the ADC (pymata_analog_read.py) and controlling a servo (pymata_servo_sweep.py).
To make sure you’ve got the latest code, and then to run one of the examples, you can use the following commands
cd pi_co-op
git pull
./examples/pymata_blink.py
Taking Things Further
Using Firmata can give you a lot of flexibility when it comes to deciding how to use your Pi Co-op. If you stick with Python, then you can learn more about the functionality offered by PyMata by looking at the documentation here. Alternatively, you might decide that you want to use another language to control the Pi Co-op. There are lots of libraries to choose from, including the excellent Johnny-Five for javascript.
Also, if you’ve got any questions in general about the Pi Co-op, and how you can use it with your Raspberry Pi, then please head over to our forums, as we’re always happy to help. ![]()
Do you make a shield convertor to let people plug standard Arduino add-ons into it?
Hi Simon,
After giving it some thought, we decided not to try to make the Pi Co-op compatible with shields. Just because a lot of things done by shields (wifi, bluetooth etc) can be done with USB dongles for the Pi. Also, there are a lot of different shields out there, with a lot of different quirks, so it would have been really hard to try and guarantee compatability with all of them.
Hopefully, this won’t prove to be the wrong decision. We’ve tried to focus on ease of use with this board (hence the PyMata tutorial) and for prototyping, we have aligned all of our headers with a 2.54mm grid, so you can easily make custom add-on boards for the Pi Co-op using standard perfboard. See time 1:23 in our youtube video for an example of this.
This also means that if you really needed to, you might be able to use an Arduino protoshield such as this one to create a kind of adaptor for an Arduino shield, but your mileage may vary.
Regards
Alan
Hello,
I would like to control this card with a c++ program created i my raspberry pi. Is there any library? where can i find it?
Thanks.
Hi there,
In this post we’re essentially loading Firmata onto the Pi Co-op and communicating with it using a library called PyMata that speaks the correct serial protocol. I’ve had a quick look on the Firmata github page and I can’t see mention of a C++ library, so you may need to follow the Firmata protocol and write one. This page looks like a useful tutorial for serial port programming in C/C++ under Linux.
Alternatively, if you only need to do fairly simple things with the Pi Co-op then you may be better off writing your own Arduino sketch for the Pi Co-op which uses a very simple serial protocol for communicating with the Pi. This way you wouldn’t have to implement the full Firmata protocol.
Hope that makes sense. Let me know if you need clarification on anything.
Regards
Alan