Welcome to OpenBuilds Community

Signup today and join in on the fun!

Sign Up

The Frog (not an acrynym!): CNC Router

Discussion in 'CNC Mills/Routers' started by Neil Rosenberg, Jan 3, 2014.
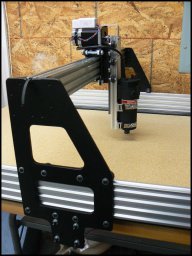
  1. kram242

    kram242 OpenBuilds Team Staff Member Builder

    Congratulations on your first cuts Neil! Always exciting to see a machine come to life for the first time, I never get tired of see it happen.
    BTW just noticed the screw tighten straps on your router mount, this is exactly what I am looking to do on the OX. I just need to find smaller versions (5mm width) to fit in the holes.
    We actually have GT2 3mm belt stock (still working on the pulleys) that needs to be added to the store it should be up there in a day or so :)
    The 20 tooth gt2 (3mm) pulleys we used for testing came from here:http://www.bbman.com/catalog/product/20-3P06-6FA3

    I always like the bits from these guys https://www.drillbitcity.com/

    Once again congrats my friend its all chips in the air from here :D
  2. Neil Rosenberg

    Neil Rosenberg Journeyman Builder

    In response to Matt -- the motor I stalled was the router itself (the high speed cutting motor), not one of the steppers. As I mentioned, I had a bit wander out, and it started to gouge the material. It was too much for the weeny motor to handle.

    I haven't yet noticed dropped steps or accumulated error, but I do keep the belts tight and don't try to accelerate the steppers faster than they can handle. That being said, it's early yet. The Nema23's I got are 270 oz-inch, 200 steps/rev, 3 amp. I'm running them at 75% power. Plenty strong, any more than that and the machine would start to tear itself apart if it jammed.

    I'll post the gantry and side plates in DXF by tomorrow, thanks for asking. I will also post a few other custom parts that may be useful. I cut these out of aluminum on a CNC plasma table, then post-machined for accurate holes.

    Mark, thanks as always for the encouragement. Means a lot to know there are folks like yourself who have "been there" and are willing to lend an ear!

    The router mount (with hose clamps) is really rigid, that puppy's not going to move. It was nice that the particular router has a true cylindrical shape, fits into the middle groove of the V-Groove, keeps it aligned. The (4) brackets are plasma cut and bent up, one-screw mount to the extrusion with a Tee nut. I cut the straps into two pieces, looped the cut ends through the brackets, then back on themselves. I also cut off excess length and put electrical tape over the cut end, it's pretty sharp:

    [​IMG]

    For those who may be interested, the belt tensioner is similar in concept to strap tighteners that have been used on backpacks and etc for years. The belt exits from the chassis through a hole I milled into the support plate, once around the slots, and then I tuck a short end back into the chassis, locks on itself that way. The screw tip has been ground into a dull point, fits into the head of the nearby screw (to keep it in place). Here are better photos, one is a screen shot from SW (minus hardware and belt):

    [​IMG] [​IMG]

    Also, thought I'd post a photo of the "drag chain" that I used on the carriage (there are two more under the chassis). I've not used them before, I really like them for keeping the wires out of harm's way. Also, I used Cat6 24 awg cable for the step motors, with like-colored wires paralleled (4x2) for greater current capacity:

    [​IMG]

    Thanks for the leads on the 3mm belts/pulleys (and router bits). I will probably pick up some of the 3mm stuff soon, glad you're adding it to the store. I'll email you separately (as promised) with parts feedback and a few other items you may consider for the store.

    Be well
    N
    Last edited: Jan 26, 2014
    kram242 likes this.
  3. Neil Rosenberg

    Neil Rosenberg Journeyman Builder

    DXF, IGS and STEP format files are now in the "Files" area for download. They're in one zip file. Enjoy!
    kram242 likes this.
  4. Nick Lancaster

    Nick Lancaster Journeyman Builder

    We need video! Because other then Kram you have your machine the furthest along!
  5. matt_o_70

    matt_o_70 Well-Known Builder

    Neil was kind enough to publish the DXF, IGES, STP formats. These are the closest thing to universal formats that exist. Most CAD programs can ingest either format with out any of the following work arounds.

    I played with eDrawings a bit and discovered that there is a work around - to use it to output files from his original models which you can then measure or modify. I posted over in the tutorials section:

    http://www.openbuilds.com/threads/solidworks-edrawings-viewer-to-sketchup.351/

    I posted this info with the hope that it may benefit anyone looking to work with these files with only freely available software. It's a little bit of work but it can be done.

    Then you can generate files you can use to get CNC cut.
    Last edited: Jan 31, 2014
    kram242 likes this.
  6. Neil Rosenberg

    Neil Rosenberg Journeyman Builder

    Glad you were able to read the files.

    Looks like the version you used of the Side Plate is from an earlier rev, or you removed the "hog holes" that I put in to reduce weight. With 1/4" aluminum plate, the extra material is not needed for suitable stiffness.

    The dimensions in your Sketchup drawing look good -- overall 14.7" x 8" for the Side Plate and 6.75" x 7.5" for the Gantry Carriage Plate. The height of the Side Plate is derived from my specific bed, which is thicker for the vacuum table. As Mark mentions in one of his videos, it's best to keep the routing location as close as possible (vertically) to the z-axis support wheels. In other words, if you plan to use a thinner bed, you may want to decrease the Side Plate height and thus lower the wheels.

    Important: the hole diameters in my models were selected to allow post-machining for bearings, threading, screw clearance and such. If anyone plans to make a Frog, I urge you to adjust the hole specs for your specific process. You can check out the purpose of each hole by looking at the final assembly. Sorry, most of the hardware is not included in the models -- if you have questions, let me know and I'll respond asap. Also, you may be able to figure it out from the photos, which I plan to supplement soon.

    I will also post a video of the thing in action. I'm not running it at full speed yet, need to get some sharp bits!

    Neil

    P.S. I have done some preliminary testing of the vacuum table. As long as I cover all unused holes (with plastic sheeting) it works really well!
  7. kram242

    kram242 OpenBuilds Team Staff Member Builder

  8. matt_o_70

    matt_o_70 Well-Known Builder

    Mark - Sure I would be glad to - Posted in tutorials..

    Neil - I do like the vacuume table concept and seeing the under slung motors I am thinking that one option is to replicate the mounting hole patten for the crossbeam so that it could be mounted in a high or lower position depending on the bed in use.
  9. kram242

    kram242 OpenBuilds Team Staff Member Builder

    Thanks Matt :)
  10. matt_o_70

    matt_o_70 Well-Known Builder

    Neil - Thanks so much for posting your files!

    I am working up things from your side plate files for my own build. I am doing this in SketchUP and will share them if anyone is interested. I like the concept leaving some material under the gantry next to your motor mounts just in case I ever want to connect the plates with additional extrusions to better box the gantry assembly. These cross braces Could also be used to drive the gantry with ACME screws under the bed if someone wanted to go that way. I have not priced out the ACME screws vs belt & pinion drive parts yet.

    upload_2014-2-1_11-51-43.png

    I also took Mark's comments in to account and figured I'd add a second set of Y axis mounting holes in the side plates so that it's possible to choose a high or low location for the gantry extrusion based on what style of spoil board or bed is chosen for a build.
  11. Neil Rosenberg

    Neil Rosenberg Journeyman Builder

    Looks great Matt, can't wait to see how the design evolves under your care! I also have thought about using a leadscrew rather than belt on the y-axis, but for now the belt is performing quite nicely.

    I'll post videos soon of both routing operations and the Donek Drag Knife (a cool tool!). No surprise, with a sharp router bit I can cut really fast and still maintain accuracy.

    Also the vacuum table has not disappointed, amazing how firmly it holds parts! I've ordered a standalone 3-stage vacuum (http://www.centralvacuummotor.com/Lighthouse/LH6765-13.JPG) for the table, should arrive soon. Word on the street is that Shop-Vacs have a nasty habit of bursting into flames when you restrict airflow for a prolonged run.

    I'm also building a dust shoe, I'm drowning in sawdust. Here's my starting point: http://www.instructables.com/id/More-stable-dust-collection-boot-for-CNC-routers/

    If it's of interest, here's the super cheap 4-axis driver I'm using. It's gotten LOTS of bad press, but so far it's behaved really well, no errors or problems at all: http://www.ebay.com/itm/4-Axis-CNC-...458?pt=LH_DefaultDomain_0&hash=item2c797b8642

    Enjoy!
    Neil
  12. Nick Lancaster

    Nick Lancaster Journeyman Builder

    Last edited: Feb 2, 2014
  13. Sage

    Sage Well-Known Builder

    Where?
    Fixed, Thanks!
    Last edited: Feb 2, 2014
  14. Nick Lancaster

    Nick Lancaster Journeyman Builder

    Updated my post with the link! Swear I pasted it in!!
  15. Neil Rosenberg

    Neil Rosenberg Journeyman Builder

    Here's a short video showing some of the features of The Frog, hope you can see it ok:

    Last edited: Feb 2, 2014
    Pawlenko M and kram242 like this.
  16. Sage

    Sage Well-Known Builder

    Nice, looking great Neil. I'm interested in any details you can provide on the z axis rack and pinion setup. How did you attach the rack? Bolt completely through the extrusion? Once attached, how did you tension the pinion against it? Lastly, you said you are using cat5 to run the stepper power, are you using stranded line? Or do you think that the cable chain will protect against breaking solid copper lines?
    Thanks!
  17. Neil Rosenberg

    Neil Rosenberg Journeyman Builder

    Glad you like the machine, thanks :)

    The rack is attached to 1/8" flat plate (threaded holes), which is in turn attached to the extrusion via Tee-nuts and screws. It's pretty easy to slide closer or further away to adjust gear engagement, then locked in place. I haven't observed any shifting. If you download the models I posted you may be able to see the details.

    For motor cabling I used Cat6 stranded 24AWG, forming 4 pairs of 2 conductors each. I don't expect to have breakage problems. I did solder tin the ends where it attaches to the driver box. The RJ45 connectors are clean and easy.
    Last edited: Feb 2, 2014
    Pawlenko M likes this.
  18. Nick Lancaster

    Nick Lancaster Journeyman Builder

  19. Neil Rosenberg

    Neil Rosenberg Journeyman Builder

    Thanks Nick :D

    Also, cool thread on the dust shoe, definitely gonna grab some ideas from that one!
  20. Robert Hummel

    Robert Hummel Custom Builder Staff Member Builder

    Well done!
    Looking good, great job on the vac table.
    I'm going to give pods a try myself.
    Just need to get my hands on a vac pump and fittings :)
    Plan is to use extrusion as the base ,pods will slide in, lock down, hose down channels to protect them
  21. Neil Rosenberg

    Neil Rosenberg Journeyman Builder

    Thanks Robert, I'm still figuring out the best ways to use the vacuum table, so far the results are promising.

    Hadn't seen Podz before (newbie!), they look like a nice solution, very flexible. Keep us informed as you progress please.

    BTW my wife is a quilter, she uses a porous stiffener called "Peltex" in some of her projects. What I've found is that a layer of Peltex (search for it on Google) between the vacuum table and the workpiece allows me to cut all the way through the piece into the Peltex, thus avoiding marring the table surface. The vacuum hold-down is not affected.
    Last edited: Feb 3, 2014
    Robert Hummel likes this.
  22. kram242

    kram242 OpenBuilds Team Staff Member Builder

    Great job Neil this build turned out great! Thanks for the tip for strapping the router on, your right its not going anywhere with those bad boys on there. You mentioned in the video about the debris in the rail and I ran into the same issue with the OX build so the plan is to add a strip of thin plastic along the slot with perhaps a small be to cover everything up nice and neat.
    Thanks for the build very cool of you to share it. :thumbsup:
  23. Robert Hummel

    Robert Hummel Custom Builder Staff Member Builder

    I was thinking the same thing and plane on using some of the leftover acrylic from the Laser V build.
    kram242 likes this.
  24. Neil Rosenberg

    Neil Rosenberg Journeyman Builder

    I have found that the dust shoe has largely eliminated dust getting into the tracks, glad I added that. Notice the two neodymium magnets -- I have holes for 4 but that was WAY too strong. I'm re-doing the brush soon, it's a balancing act between too-stiff and not stiff enough. Also, I've added some new comments over in the build description area, plus a photo of a new vacuum motor and my first 3d contouring project. Onward!

    [​IMG]
    [​IMG]
    kram242 and Pawlenko M like this.
  25. Tweakie

    Tweakie OpenBuilds Team Staff Member Builder

    Excellent dust shoe and beautiful job with the 3D crest Neil :thumbsup:

    Tweakie.
  26. Neil Rosenberg

    Neil Rosenberg Journeyman Builder

  27. Nick Lancaster

    Nick Lancaster Journeyman Builder

    looking good. How loud is that vacuum for the table?
  28. Neil Rosenberg

    Neil Rosenberg Journeyman Builder

    Hard to be precise. It's not as loud as a shopvac, mostly due to the muffler.

    Anyway, the router is quite loud so I wear Peltor earmuffs when I'm working.
  29. Nick Lancaster

    Nick Lancaster Journeyman Builder

    you think that little router is loud? My big CNC router uses a 2.25hp router. you can hear it next door.

    Earmuffs, required CNC accessory.
  30. Neil Rosenberg

    Neil Rosenberg Journeyman Builder

Share This Page