Welcome to OpenBuilds Community

Signup today and join in on the fun!

Sign Up

Laser Engraver Control Board

Discussion in 'Laser Cutters' started by oni305, Feb 9, 2014.
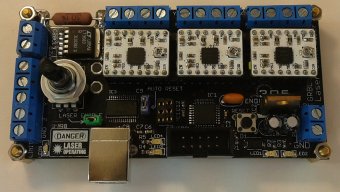
  1. oni305

    oni305 Veteran Builder

  2. Tweakie

    Tweakie OpenBuilds Team Staff Member Builder

    Excellent work oni305 - very neat and compact PCB - I look forward to seeing the details of the rest of the build.

    What power laser and what wavelength are you using ?

    Tweakie.
  3. oni305

    oni305 Veteran Builder

    I use a 3Watt 445nm Laser Diode but i've limited the current to a 2.1A which is about 2.5W to increase the lifespan of the laser

    and with the trimmer on the board i can regulate the current through the Laser from 1mA to the max 2.1A
  4. kram242

    kram242 OpenBuilds Team Staff Member Builder

  5. oni305

    oni305 Veteran Builder

    Many thanks for the support!
    from the other Topic:

    I've just finished the algorithm to translate the image to Gcode

    Tested with the openbuilds logo

    original (with white background):
    image.png

    translate in B/W:
    image_soglia_fissa.png

    and the attached file "gcode.txt" is the generated gcode (obviously...), is not finished yet (it's only a test), but I'm pretty happy with it

    Attached Files:

    lexluther and kram242 like this.
  6. kram242

    kram242 OpenBuilds Team Staff Member Builder

    :thumbsup:
  7. Tweakie

    Tweakie OpenBuilds Team Staff Member Builder

    GCode is good too. :thumbsup:

    Tweakie.

    DSC01663a.jpg
    Robert Hummel, kram242 and oni305 like this.
  8. oni305

    oni305 Veteran Builder

    Cool:D tnx Tweakie.

    I've modified the scritpt to scale the image at 10pixel/mm, try this:

    Attached Files:

  9. Tweakie

    Tweakie OpenBuilds Team Staff Member Builder

    That's fine also but I don't have a problem with size (I can always scale the GCode at run-time). One thing that should be considered and as noted by Robert http://openbuilds.com/threads/laser-v.37/page-7#post-2237 - Ideally your generated GCode should have all moves following M03 as G01 and all moves following M05 as G00 with a feed-rate set at the start of the code.

    Tweakie.

    DSC01664a.jpg
    Last edited: Feb 15, 2014
  10. oni305

    oni305 Veteran Builder

    Yes i know, but 1 step a time

    new with feed 500 & 100 (gcode_feed.txt)

    mmmm but I think to have a problem with the individual pixels, can someone try this (singledot.txt)

    Attached Files:

  11. Tweakie

    Tweakie OpenBuilds Team Staff Member Builder

    The feed.txt is brilliant – excellent work. :thumbsup:

    Just one point - G00 moves do not take account of feed-rate so the F500 can be omitted as it servers no purpose.


    I had to scale up the singledot.txt file because of the small moves but even then the individual dots are only just discernable - perhaps a 40Watt laser is a bit overkill for this type of test. :(


    I don’t know if this helps.


    Tweakie.

    DSC01665a.jpg
  12. oni305

    oni305 Veteran Builder

    Theoretically yes, but i can't figure out if GRBL implements G00 and G01 in the same manner ...
    I have to make some test with my own board to check it :)

    Every things helps for the test ( especially because at the moment i have dismantled my own laser [because i want to rebuild it with the vslot])
  13. Robert Hummel

    Robert Hummel Custom Builder Staff Member Builder

    G01 runs the set feed rate in your console
    G00 runs the set speed that $5 is set to in GRBL believe its "seek rate" not at pc right now
    I will run your code in 15 mins
  14. Robert Hummel

    Robert Hummel Custom Builder Staff Member Builder

    Ok here it is :)
    image.jpg
    1 other thing is m05 must be the last comment or the laser stays on and after code axis don't home. see my changes

    Attached Files:

    Last edited: Feb 15, 2014
  15. oni305

    oni305 Veteran Builder

    Noted..

    Do you think that it's worth an option to change the resolution from 10pix/mm (actual) to 5pix/mm or 1pix/mm ??
  16. Robert Hummel

    Robert Hummel Custom Builder Staff Member Builder

    Any smaller and I think you may run into issues maybe 5 minimum.
    Great work for sure!
  17. oni305

    oni305 Veteran Builder

    Tnx @Robert Hummel , can you try this files:

    Attached Files:

  18. Robert Hummel

    Robert Hummel Custom Builder Staff Member Builder

    I will run them now :)
  19. Robert Hummel

    Robert Hummel Custom Builder Staff Member Builder

    5 gave best results, again M05 was not the last instruction so that is why the star had a fault
    image.jpg
    Yusuf Tumer likes this.
  20. oni305

    oni305 Veteran Builder

    Great!!
    Ok I'll add the option to choose the resolution on the extension. :cool:

    Now I've edited the script to add M05 & G00 X0 Y0 at the end of the gcode ;)

    Any suggestion on other options to add?

    Now the extension looks like this:
    exte.png
    Yusuf Tumer likes this.
  21. Robert Hummel

    Robert Hummel Custom Builder Staff Member Builder

    Looks good to me so far ;)
    Would need to play with it a bit to give you real feed back.
    Awesome work for sure!

    P.s English buttons? :p
  22. oni305

    oni305 Veteran Builder

    Thanks! :D
    Inkscape fault (even for backgound color), i've installed the italian version, so the buttons are translated :p (i don't know why backgound color is translated too...)

    Ok, now i can start to write the real extension, merging al the code i'writen so far...
  23. Robert Hummel

    Robert Hummel Custom Builder Staff Member Builder

    Nice work! I need to learn to program big time :)
  24. oni305

    oni305 Veteran Builder

    It's working!!
    Now I have to make only a few tweaks in the code and it's done!!

    estensione.png
    Yusuf Tumer and kram242 like this.
  25. Robert Hummel

    Robert Hummel Custom Builder Staff Member Builder

    Nice work ! Can't wait to try it ;)
  26. oni305

    oni305 Veteran Builder

    So here we are, the release candidate of the extension!!!

    Require: Inkscape ;)

    Installing: extract the archive and simply copy all the files in the folder "Extensions" of Inkscape

    Windows ) "C:\<...>\Inkscape\share\extensions"
    Linux ) "/usr/share/inkscape/extensions"
    Mac ) "/Applications/Inkscape.app/Contents/Resources/extensions"

    for unix (& mac maybe) change the permission on the file:
    chmod 755 png.py
    chmod 755 raster2laser_gcode.py
    chmod 644 raster2laser_gcode.inx

    Enjoy,

    PS: to run the extension go to: Extension > 305 Engineering > Raster 2 Laser GCode generator

    EDIT: removed the file temporally

    Attached Files:

    Last edited: Feb 21, 2014
    Yusuf Tumer likes this.
  27. Robert Hummel

    Robert Hummel Custom Builder Staff Member Builder

    Ty! I will give it an extensive work out ;)
    Great work my friend for sure
  28. oni305

    oni305 Veteran Builder

    I hope that you'll enjoy it

    just a side note: the extension export the whole inkscape document, so the first thing to do is to change the dimension of the document:

    note.png
    Yusuf Tumer and Robert Hummel like this.
  29. Robert Hummel

    Robert Hummel Custom Builder Staff Member Builder

    I did that and am running a test print now, must say I'm impressed :)
    1 thing if it can be added is a browse button for file save location as most windows users are use to point and click.
    I will post the results as soon as it is done ;)
  30. oni305

    oni305 Veteran Builder

    Unfortunately it can't be added, inkscape gives only a few options for the GUI
    ( http://wiki.inkscape.org/wiki/index.php/INX_Parameters )


    Tnx ;)

Share This Page