Welcome to OpenBuilds Community

Signup today and join in on the fun!

Sign Up

OpenBuilds OX CNC Machine

Discussion in 'CNC Mills/Routers' started by kram242, Dec 15, 2013.
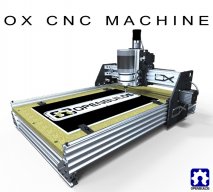
  1. SlyClockWerkz

    SlyClockWerkz Journeyman Builder

    Using the hobbycnc pro 4 axis? How do you like it so far?
    I just ordered one myself. I have the EZ driver from hobbycnc right now, that I use on my small desktop mill.
  2. dddman

    dddman Journeyman Builder

    I ordered all the hardware yesterday for an 1000X1500 footprint OX! Protodrake has a lot lower stock now :p Does anyone have any idea if I'll have to modify something of the design for this bigger OX? I also bought a Makita 3709 (3/4HP, 30K RPM, 4A, 1/4" shaft). Do you think that this router will be powerful enough to cut aluminium? Do you know if there is an adapter to reduce from 1/4" to 1/8" end mill diameter?

    Thank you!
  3. SlyClockWerkz

    SlyClockWerkz Journeyman Builder

    I think it will be plenty powerful. I also have that size machine on order
  4. dddman

    dddman Journeyman Builder

  5. Rick 2.0

    Rick 2.0 Journeyman Builder

    Last edited: Mar 5, 2014
  6. Michael

    Michael Well-Known Builder

    I was looking at upgrading my Routy to an OX which seems pretty straight forward. I keep running into issue with the DXF files for the plates. I have sent them to a few local machine shop and they are all mentioning that they can't cut them because the circles are polylines and not radii. Any idea on the best way to fix this?
  7. JustinTime

    JustinTime Veteran Builder

    Plenty of power to do most work. If you have a doubt, just start with a shallow and slow cut and then increase your speed (IPM) and/or depth of the cut as you go.
    What holds the bit is a collett. The colletts can be changed to any size. 1/4", 3/16" and 1/8'
  8. kram242

    kram242 OpenBuilds Team Staff Member Builder

    I can upload a new DXF that may help with that. I am trying out some new exporters in the pro version of SketchUp.

    lol I was sling'n some oil in that pic :) I am the one to blame for mounting that backwards :rolleyes: Rushing around to take the pic and thats what happens:duh:
    P.S. It has since been corrected :D
    Last edited: Mar 5, 2014
    Michael likes this.
  9. Colin Russon

    Colin Russon Journeyman Builder

    Yep, its me. Colin.

    The end plate pics are there to show all how good this machine really is, I don't have the space to test a machine here and I did not spot the XO!

    My machine is different, as usual, the gantry plates are 3mm mild steel powder coated and very, very rigid, but really heavy, and they can be doubled up to form 6mm or split to provide balanced rail support. The split plate design has been very popular with clients.
  10. Michael

    Michael Well-Known Builder

    Awesome! Thanks kram
  11. kram242

    kram242 OpenBuilds Team Staff Member Builder

    I will let you know when its there. just did an update and have a little trouble editing my build. :)
  12. SlyClockWerkz

    SlyClockWerkz Journeyman Builder

    Can you elaborate on the split design for the plate s? I was toying with the idea of using mild steel. How much heavier do you think the steel is than aluminum plates? Concerns about v wheels deforming?
  13. kram242

    kram242 OpenBuilds Team Staff Member Builder

  14. SlyClockWerkz

    SlyClockWerkz Journeyman Builder

    Hey Kram,
    I was having the same issue with some shops inquiring about the polygon issue as well.
    Also, the new files you just posted aren't true circles either, also made up of polylines.
  15. Michael

    Michael Well-Known Builder

    Hey Kram,
    Thanks for the files, just looked at the new DXF and still rocking polylines...
    SlyClockWerkz likes this.
  16. kram242

    kram242 OpenBuilds Team Staff Member Builder

    Ok thank you for the update I am going to dig into that a little deeper and see whats going on because I know it can be done. I think that I am missing a setting some where
  17. SlyClockWerkz

    SlyClockWerkz Journeyman Builder

    I've been messing around with the dxf in autocad for about an hour, and have been trying to convert to polylines, and then creating a circle from them. No luck. I've read that Sketchup does not draw true circles. They are also drawn in line segments, so I doubt Sketchup will be able to export true circles.

    Should I take one for the team and re draw them in autocad?

    P.S. Where can I find the 3mm pitch pulleys? Unless you guys are going to be stocking them soon..
  18. kram242

    kram242 OpenBuilds Team Staff Member Builder

    They should be in stock at the OpenBuilds Part Store tomorrow :) Thanks for the support!

    Found this great response on another thread about someone trying to export for laser cutting. I will be trying option # 2. Most people would not think to export this way but if it works great!

    Today, there are about three different ways to export DXF from a SketchUp model. All might require some postprocessing in AutoCad or some other application to fulfill all the requirements of your laser cutting technician.

    1. Export a 2D drawing from SketchUp:
    - you can tweak the export options so that all you get are simple lines on layer 0.
    - faces will not get exported
    - circles and arcs will be split into straight segments
    - in postprocessing you would have to change the colour of layer 0 to red and recreate your etching areas

    2. Export a 3D model from SketchUp
    - you can export your "2D drawing" as a 3D model
    - SketchUp layers will be respected
    - SketchUp circles and arcs will convert to AutoCad circles and arcs
    - SketchUp faces (that you have used to define your etching areas) will convert to AutoCad polyface entities. OK if the etcher can work with them
    - you may have to adjust the colours in AutoCad

    3. Export a 2D drawing from the LayOut application (create a vector-rendered viewport of your model to 1:1 scale)
    - all edges etc. will be converted to AutoCad lines with a specified plotting thickness and a black (RGB 0,0,0) colour
    - you can choose to export your faces; they will become solid hatch objects
    - you may have to adjust the colours and line widths in postprocessing


    Normally AutoCad lines do not have any thickness at all, and the width setting is only for plotting. 2D polylines can have a width.

    Anssi
    Robert Hummel likes this.
  19. kram242

    kram242 OpenBuilds Team Staff Member Builder

    Ok I tried option #2 above and it seems like it may have worked. I have no way of testing this at the moment so if someone want to check to see if these are poly lines or circles that would be great. Thanks in advance

    Attached Files:

  20. SlyClockWerkz

    SlyClockWerkz Journeyman Builder

    Opened her up quick before bed time, it sort of worked... still some post processing needed to be done though.

    Attached screen grab of what a close up circle looks like. Its weird too, the very edges of the parts still appear to be line segments, unlike the holes which now have both a true circle and a polygon (see attached). I can manually re draw the corners though.

    I can try to clean the rest up tomorrow night if someone doesn't beat me to it.

    Attached Files:

  21. kram242

    kram242 OpenBuilds Team Staff Member Builder

    Nice thanks @SlyClockWerkz I think I may know what the double line thing is and its my fault. I did the lazy way out when setting dimensions and decided I would just add circles and arcs over the existing layer instead of going in and setting them :)
    I will try this with out them and lets see how it does
  22. kram242

    kram242 OpenBuilds Team Staff Member Builder

    Can we give these a try? I am thinking 2 will work but 3 will not

    Attached Files:

  23. SlyClockWerkz

    SlyClockWerkz Journeyman Builder

    2 is more or less the same as the first one you posted. 3 doesn't work.

    However, I did finished cleaning up the main side plates. Rest is for tomorrow
  24. kram242

    kram242 OpenBuilds Team Staff Member Builder

    Good deal, thanks
    Do you still have the double lines or is all good now? Is clean up required on the #2 I just sent?
  25. Colin Russon

    Colin Russon Journeyman Builder

    Here are some pictures, one side shows double 3mm plates, the other the split plate design. My reference to the mild steel being heavy was meant in comparison to aluminium. A double plate weighs 1.6Kg, perhaps somebody else could state what the weight of a 6mm aluminium plate is to compare the two different materials?

    I don't think there is much chance of deformity, especially using the solid v-wheels.

    OX XYZ Axis Choices.175.jpg OX XYZ Axis Choices.174.jpg OX XYZ Axis Choices.173.jpg OX XYZ Axis Choices.172.jpg OX XYZ Axis Choices.37.jpg OX XYZ Axis Choices.36.jpg
    OX XYZ Axis Choices.175.jpg OX XYZ Axis Choices.174.jpg OX XYZ Axis Choices.173.jpg
    OX XYZ Axis Choices.175.jpg
    Last edited: Mar 6, 2014
  26. asb_79

    asb_79 Well-Known Builder

    The 6mm Aluminium plates I have weighs ~568g each.
  27. SlyClockWerkz

    SlyClockWerkz Journeyman Builder

    The double lines were still there
  28. kram242

    kram242 OpenBuilds Team Staff Member Builder

    @SlyClockWerkz thank you again I will read more and see what I may be doing wrong
    @Colin Russon The double plate mod! :thumbsup: Looks like its very strong and will help to keep debris out of the wheels and pulleys.
    Colin Russon likes this.
  29. Rick 2.0

    Rick 2.0 Journeyman Builder

    Aluminum weights can vary from .3247x to .3497x the weight of steel. Best rule of thumb is just to multiply aluminum weight by 3 (or 2.97) to get an idea of what a similar volume of steel weighs.
    Colin Russon likes this.
  30. SlyClockWerkz

    SlyClockWerkz Journeyman Builder

    Hey Kram242, see the attached DXF for a model w/ true circles and arcs. Should be good to go.

    Attached Files:

    Michael likes this.

Share This Page