Skip to content

Introducing the GitHub Community Cast

At the heart of what makes GitHub great are the thousands of open source communities that build incredible things every day. The brand new GitHub Community Cast shines a light on these awesome projects and the people that make them.

Take a look inside a project, learn about their tools and workflow, discover where you can get involved, and get inspired for your own work. In addition to seeing behind the curtain on a great open source project, you'll also get news and updates from around the GitHub community.

The inaugural episode features an interview with Andy Miller from the Grav project, a modern flat-file CMS with some bold ideas. We also share some of the new features recently landed in GitHub and events going on around the GitHub community.

podcast

You can each episode from our SoundCloud page or subscribe to the podcast feed.

Learn from the experts: RSVP for workshops at Git Merge

451a1e06-7de6-4ebe-a30d-95008b2e1efd

At Git Merge—a conference for the Git community—you'll join developers who are committed to the future of Git. In addition to seeing an amazing lineup of speakers, attendees of all levels are invited to participate in a series of workshops led by the best Git trainers in the world. You won’t want to miss this unique opportunity to brush up on your skills while learning from the experts.

Workshops are 60-90 minutes and will take place concurrently with the general sessions. Take a moment to RSVP here to reserve a seat. Please note that you must also be registered for the main conference in order to attend any workshops.

Get out of (almost) anything with Git
One of the big advantages of version control is knowing you have a safety net in case anything goes awry. In this workshop, we'll explore common predicaments and discuss how to use the best tool for the job to get out of different tight spots. While the material we'll cover can help the beginner and the seasoned professional alike, attendees should have a basic working knowledge of Git and be comfortable on the command line.

Making the switch to Git LFS
If you're starting a new project, using Git LFS is easy. Converting an existing project, however, can present a few challenges. In this workshop, we'll adapt a sample project to use with Git LFS, Git's filter-branch command, and the BFG Repo-Cleaner. We'll also talk about the implications these approaches have on your project and your collaborators. Attendees should have a general understanding of Git internals and be comfortable working on the command line.

Mastering git-imerge
Git-imerge reduces the pain of merge conflicts to its unavoidable minimum, by finding and presenting the smallest possible conflicts: those between the changes introduced by one commit from each branch. It also lets you interrupt, save, and publish in-progress merges—so you can test partially-merged code, or even collaboratively fix conflicts. In addition, it offers a straightforward method for preserving history while rebasing. This workshop will teach you how to use git-imerge to do all of this. It is intended for reasonably experienced users though it requires no expertise in Git.

Scripting Git
This workshop will cover several ways to write Git scripts. We will start by using the command-line client and Git's plumbing commands in shell scripts. Then we'll demonstrate how to write Git scripts in scripting languages, by using libgit2 and the various bindings to it (the workshop examples will focus on Ruby and Rugged). Attendees should understand the basics of Git internals.

Check out the full conference schedule here. Git Merge is happening on April 5, 2016 in New York City. We hope to see you there!

Creating a new contributor on-ramp

One of the most important elements of creating a strong community is shaping the new contributor experience. The on-boarding experience for new participants plays a huge role in how quickly someone can get up and running on your project. The most successful projects make this experience simple and accessible.

Getting someone started with their first contribution in a community typically follows a linear path, from discovery through appreciation. The environmental factors surrounding your project play the largest role in making that experience comfortable, empowering, and worthwhile.

The new contributor on-ramp

The on-ramp is a framework for growing your community. From getting your project noticed through celebrating a new contributor, building out each area will help your community thrive.

New Developer On-Ramp

At the beginning is a user that hasn't yet discovered your community. And at the end is a user that has made their first contribution to your project. Along their journey, the user usually goes through six steps of progress:

  1. Discover that the community exists and welcomes contributions from new members.
  2. Setup tools needed to build the project and create a contribution (e.g. editors, compilers, libraries, frameworks).
  3. Learn skills and knowledge to understand the codebase, contribution guidelines, and understand how their contribution will be reviewed.
  4. Identify tasks to work on, or know what kind of contributions would be welcome and worthwhile.
  5. Get help with the questions, queries, and sticking points they may have with their first contribution.
  6. Feel appreciated when they have successfully made their first contribution and at other key moments to know that the community is kind, supportive, and welcoming!

Within each of the six steps, there are many different things you could implement. This series will take a look at each step in turn, and for the rest of this post we'll delve into what you can do to help your project be discovered.

Discover

"If you build it, they will come" only works for Kevin Costner and baseball fields. For your project, the first step in building a community is making your project discoverable.

There are three goals for the discover step in the on-ramp:

  1. Welcome and inform new visitors about the community
  2. Establish your project as inclusive and welcoming of new contributors
  3. Show people how they can begin to contribute to the community

There are plenty of options on how to achieve these goals, below are a few of the basics that every community can use.

Create a README.md file

Whenever you visit a GitHub repo, the contents of the README file is displayed underneath the file listing. It is a great opportunity to give a quick overview, including:

  • What your project is and what it does
  • How to build and run the project
  • Ask for new contributors
  • Provide details on how to get started, such as a CONTRIBUTING.md file

By using Markdown you'll be able to format the README for easier viewing and link to resources for new contributors. Plus it'll look great!

Create a project website

While a README.md is a good start, many projects can benefit from a comprehensive website. A full site gives the project a home for things like extensive guides, tutorials, and blogs.

Build the site from the perspective of a new user to your project:

  • Highlight the features of the project (with screenshots, if applicable)
  • How to install it
  • How to use it
  • Where to get in touch with the community
  • How to get involved in the community

The front page should have the most important information, like what the project does, how to get it, and how new contributors can join. Check out Bootstrap, Jekyll, or Electron for some ideas for your project site.

A fast way to get started with this is with GitHub Pages, which provides free hosting for a project website. When you create this site it will be publicly hosted at http://<yourproject>.github.io.

Engage on social media

Social media is a powerful tool for raising awareness about your project. Many people will follow the social media accounts of projects to keep up-to-date on news and announcements, it is also a great place to engage new contributors. Though tread lightly at first as social media can be time-consuming to maintain.

Twitter and Facebook are the best places to start. After registering the accounts, take some time to spruce up the profiles. Match the account design to your project website, and link back to it.

You can grow your community on social media by providing valuable and interesting content. Images and video are great additions to social posts. Be careful not to over-saturate your audience with too much content though. You should stick to:

  • Links to blog posts with updates, news, and other material
  • Videos with demos, screenshots of new features, and other visual content
  • Invitations for users to participate in issues, surveys, or other ways of getting engaged
  • News about growth of the project, partnerships with companies/organizations, and interesting use cases

A useful tool to simplify social media is Buffer. You can prepare your posts and content ahead of time, and it'll publish it on a schedule. By dedicating time to your social media strategy, you can free up your time for the week ahead.

Promote the community

There are many other ways to get the word out and highlight the work happening in your community. A few places you can start:

  • Organize Google Hangouts on Air to host an interactive show that gets the community involved. A bi-monthly show could be used to demonstrate new features, answer questions, or feature a new contributor.
  • Do interviews on podcasts, news website, and blogs to talk about the vision of the project and get people involved. It is often as simple as asking the site or podcast if they'd be interested in featuring your project.
  • Speak at conferences to show the great work going on in the project and provide simple steps for how people can get involved.

The new contributor on-ramp is a valuable framework to make the new user experience simple, empowering, and effective. These basic building blocks will setup your project to have a healthy and thriving community of contributors. We'll dive into the Setup Tools and Learn Skills steps in the next installment of the series.

Udacity joins the Student Developer Pack

Student Developer Pack + Udacity

Following up on the release of the Ruby Nanodegree program that we co-created with Udacity, we've extended our partnership to offer GitHub Student Developer Pack members one month of free access to any Nanodegree program. Pack members can choose from Android Developer, Front-End Web Developer, Data Analyst, or any of the 12 Nanodegree programs offered by Udacity.

In a Nanodegree program, you will:

  • Learn at your own pace from industry experts at Google, Facebook, and GitHub
  • Get access to coaches who provide you with personalized guidance, accountability, and code review
  • Create a portfolio of work to showcase your skills
  • Receive career support to help with your job search, and a guaranteed job when you sign up for Nanodegree Plus

The Student Developer Pack gives students free access to the best developer tools from 15 different technology companies like Stripe, Travis CI, and Unreal Engine. Now, with Udacity included in the pack, it's even easier for students to get started learning to program with professional tools.

Students, get your pack.

Kindly Closing Pull Requests

Getting your first pull request from an outside contributor on GitHub is an exciting experience. Someone cared enough about the problem you were solving to check it out themselves, change something, and contribute that change back to your project. When your project has a relatively small number of high-quality, desirable incoming pull requests it is easy to happily merge them.

Where things can become more difficult is when your project becomes more notable and the quality, desirability, or number of pull requests you receive causes difficulties. Now the positive feeling you had about the time people spent can be reversed; you don't want to reject someone's work when they have already spent the time to get it included.

Let's discuss some common types of pull requests that can be closed and how to do so in a way that encourages positive behavior in your community (rather than discouraging participation).

Close pull requests you will never accept

Sometimes outside contributors will submit pull requests for changes that you don't want to make to your project. For example, they may submit a feature you consider to be out-of-scope for your project. In this case the best option is to politely explain to users that, although you value their contribution, you are unwilling to accept it and close their pull request. Ideally, also explain to them and in a CONTRIBUTING.md file how they can get a better indication in the future on what would or would not be accepted before they begin the work. The github/git-lfs project's CONTRIBUTING.md file provides a good explanation of what features might be accepted.

Close pull requests you cannot accept

Hopefully you have continuous integration set up for your project to test pull requests before they are merged. In some cases, outside contributors may submit a change that breaks continuous integration tests and they may be unable or unwilling to make the changes required for the pull request to be merged. Another situation that can occur is that you request changes be made but the contributor never responds. In this case, it's better to close the pull request after a fair amount of time with no response or fix (e.g. a couple of weeks) and note this policy in a CONTRIBUTING.md file (e.g. that merging a pull request requires passing tests). This does not need to be permanent; the contributor can always make more changes and submit another pull request in future.

Close pull requests on unmaintained projects

You may have created a project to solve a particular problem that you no longer have and open-sourced it just to share it with the community. In this case, consider documenting it in the README that you will not be accepting pull requests and close any that are submitted. Hopefully the clarification of project status in the README means the project will not receive any pull requests. If this is decided when you already have open pull requests: politely close them and explain why.

If your community has enough interest in maintaining the project they may fork it and decide to manage contributions there. A great final thing you can do with your project is to point people to the new project in the README and "bless" it as the new version of your project.

Close pull requests that turn sour

Discussions on pull requests can sometimes deviate from the original intent of the pull request and may even become unpleasant. In those cases, prioritize care for yourself and your community by closing (and optionally locking) pull requests. The original intent can be dealt with in another pull request.


For every pull request it's important to consider the users and maintainers of your project and ask yourself, "would merging this pull request make the project better or worse for them?". If you cannot answer "better" to this question: spend the time to help the outside contributor alter the pull request or submit another pull request for something you would be able to merge. Do not merge pull requests out of guilt for how much work the submitter has put in; you will only regret doing so in the long-term.

Although it's never nice to reject someone's work it's preferable to leaving pull requests open that you will never merge. Those pull requests will just hang over you and the contributor indefinitely. One of the indicators of a healthy project is its responsiveness to contributions, whether it is giving feedback, merging, or closing pull requests.

This post explains some of the reasons why you might want to close pull requests on your project and how to do so. We hope this helps project maintainers and contributors use pull requests to build software more effectively.

More code review tools

Effective code review catches bugs before they’re deployed, improves code consistency, and helps educate new developers. We’re adding new features to make code review on GitHub faster and more flexible.

Find what you’re looking for, faster

Pull requests with many changes sometimes require review from several people with different areas of expertise. If you’re a Ruby expert, for example, you might want to focus just on the Ruby code and ignore any changes made to HTML and CSS files. You can use the new files list to search by extensions like .rb, .html, etc. You can also filter by filename if you know what you’re looking for.

Find files you’re looking for, faster

More flexible review

Not all teams review code the same way. The most popular style on GitHub is reviewing all changes in a pull request at once, making the pull request the unit of change. Some teams choose to use a commit-by-commit workflow where each commit is treated as the unit of change and is isolated for review.

Page through commits easily

For teams using this style, you’ll now have access to the new commits list in the review bar which can help you quickly find the commit you want to review. We’ve also added pagination and new keyboard shortcuts to make navigating through commits in a pull request even easier. Use the ? key when viewing a pull request to view the list of keyboard shortcuts.

Use previous and next buttons to navigate through commits

View comments with more context

Every day, developers have interesting conversations and debates about code during the review process. These conversations can help new and future developers gain context quickly and better understand how and why a codebase has evolved over time. To ensure these conversations and the accompanying diffs are never lost we’ve made it easier to get deeper context on any line comment, even if it has been outdated by newer changes.

Use the “view outdated diff” button for more context

Pick up where you left off

While code review is essential for high quality code, it can be a long and tiring process, especially for projects with many incoming pull requests. It’s often most helpful to view just the new changes that have occured after you have reviewed a pull request, so we’ve added a timeline indicator to help you get to those changes, faster.

New changes are now marked in the timeline

Today’s changes are all about making code review on GitHub faster and more flexible for you and your teams. Check out the documentation for more information on working with pull requests. As always, get in touch with us for any questions or feedback. We’d love to hear how we can make code review even better.

Open Source Alley at OSCON: Call For Projects

OSCON is headed to Austin this year and we're bringing back the GitHub Open Source Alley. The alley features open source projects from across the community where they can chat with attendees, share their work, and get new contributors involved. OSCON runs from May 17 - 19th, 2016, in Austin and we'd like to invite you to apply to be a part of Open Source Alley.

GitHub Open Source Alley

As a featured project at one of the most popular open source conferences in the world, you'll get:

  • Table in Open Source Alley adjacent to GitHub's booth
  • Two complimentary OSCON passes for contributors and maintainers
  • Dedicated presentation time in the GitHub booth to highlight your project, deep dive into the code, and get people involved.

To be considered, you just need to complete the application by Friday, April 1st, 2016. The application form has the complete details and requirements for participating.

Can't wait to see you in Austin!

CodeConf LA tickets are now on sale

CodeConf LA June 27-29

CodeConf LA will converge June 27-29, 2016 in sunny Los Angeles for three days of unforgettable discussions.

This year’s event will focus on systems engineering projects, practices, and programs in the open source community. We'll explore topics ranging from systems programming practices to operating applications at scale over three days and 30+ sessions, lightning talks, and workshops.

Tickets

Early Bird tickets are now on sale for $299. Grab yours before April 9th, when prices will go up by $100. While you're at it, consider purchasing a scholarship ticket, which will be granted to someone from an underrepresented community who would not be unable to attend otherwise.

Sessions

June 27: A full day of workshops and training
June 28-29: 30+ Featured sessions, lightning talks and speaker Q&A

We believe that competing and complementary opinions lead to valuable insights. Over the course of the conference, there will be back-to-back talks exploring different subjects from contrasting perspectives, followed by a chance to participate in the conversation with other attendees.

If you have a subject for a session in mind or would like to give a talk, please submit a proposal. We'll be finalizing the agenda over the next few months, so follow along on codeconf.com and Twitter for updates.

Hotel

If you're coming from out of town, stay nearby at the W Hollywood.

CodeConf is accessible from both LAX and BUR airports, and is just around the corner from the Hollywood/Vine LA Metro stop.

You won’t want to miss this educational and inspirational event, dedicated to the open source community. Hope to see you there!

Add Reactions to Pull Requests, Issues, and Comments

Every day, thousands of people are having conversations on GitHub around code, design, bugs, and new ideas. Sometimes there are complex and nuanced points to be made, but other times you just want to :+1: someone else's comment. We're adding Reactions to conversations today to help people express their feelings more simply and effectively.

While people have been able to include emoji in responses for a long time, using them as reactions resulted in a lot of noise. In many cases, especially on popular projects, the result is a long thread full of emoji and not much content, which makes it difficult to have a discussion. With reactions, you can now reduce the noise in these threads.

We decided to choose reactions that are relevant to the conversations people have on GitHub. :+1::-1::smile::confused::heart::tada: cover the range of reactions our users typically express through comments on GitHub. We’re looking forward to seeing how the GitHub community uses this set of reactions.

Reactions are available on all Issues and Pull Requests on GitHub today. So go ahead…:+1: or :tada: to your :heart:s content.

Issue references and @mentions for GitHub Desktop

GitHub Desktop on both Windows and Mac now provides suggestions when mentioning team members, referencing Issues, and adding more :tada: to your commit messages and Pull Requests.

Just as you would on GitHub.com the website, you can bring another collaborator into the conversation by prefacing their username with @, reference any Issue by hitting #, and include any emoji by putting : around its name. Happy shipping! :sparkles:

demonstration of Issue lookup, @ mentions, and emoji lookup

Upgrading your Textile posts to Markdown

A month ago, we announced that GitHub Pages had upgraded to Jekyll 3.0.

Starting May 1st, 2016, GitHub Pages will no longer support Textile. If you are currently using Textile (Redcloth) to author your Jekyll site, you'll need to convert your site to use Markdown instead.

Here are some tips for converting from Textile to Markdown.

Manual conversion

On sites with just a few Textile pages, editing those by hand may be the fastest way to convert to Markdown. Here are some of the most important changes.

Textile Markdown
headings h1. text # text
h2. text ## text
h3. text ### text
links "link-text (title)":url [link-text](url "title")
bullet lists * item * item
** nested item * indent nested item
numbered lists # item 1. item
## nested item 1. indent nested item
italics _italics_ _italics_
bold *bold* **bold**
code <code> code </code> `code in backticks`
blockquotes bq. text... > text...

For more details refer to the Textile docs and the GFM cheatsheet

Automated conversion from .textile to .md with pandoc

Users with many Textile files in their Jekyll Pages site can leverage pandoc, a utility for converting between different markup formats.

The tomd shell script uses awk and sed to overcome the biggest limitations of pandoc, filtering out the sections listed below, which pandoc doesn't recognize, and re-inserting them into the converted Markdown.

  • YAML frontmatter at the top of .textile files
  • {% highlight %} blocks
  • <notextile> blocks

To run tomd

  1. Install pandoc from https://github.com/jgm/pandoc/releases or here.
  2. Download or clone tomd.
  3. Copy the tomd script and the two .awk files into your Jekyll project.
  4. Invoke the script with ./tomd from inside your Jekyll project folder.
  5. Validate the results.

The script will look for any .textile files in the _posts directory, convert them to .md, and leave backups of the original .textile files in a new directory called _old_posts. You can override the names of the directories with arguments to the script.

If everything works, you will see output like:

screen-shot

NOTE: This process may still produce some incorrect output, so check your results.

Known issues include:

  1. Lost CSS references e.g. from Textile .p(classname)
  2. Literal HTML mixed with Textile formatting e.g. <sup>"textile-link-text":url</sup>

Running under Windows

The latest version of pandoc for Windows can be downloaded from https://github.com/jgm/pandoc/releases/.

In addition to pandoc, tomd requires a unix-y shell and utilities. The easiest way to get those for Windows is by installing the default set of cygwin utilities.

Before running tomd, use cygwin dos2unix and run it against the tomd file to remove extra linefeeds.

The output of running tomd in the cygwin shell should look very similar to the OSX output above.

Speakers Announced for Git Merge 2016

451a1e06-7de6-4ebe-a30d-95008b2e1efd

We are excited to announce our confirmed speakers for Git Merge 2016! On April 5th, 2016 at New York City's New World Stages (350 West 50th Street, New York City) we'll converge around a system that has become an integral part of all of our development workflows. This year’s Git Merge speakers will explore everything from scaling Git to Git optimizations. In addition to four training workshops by some of the best Git trainers in the world, you won’t want to miss these sessions:

Greg Kroah-Hartman, a Fellow at the Linux Foundation, will present on Linux kernel development. Hear his advice on how to stay sane while keeping up with development (hint: it’s Git). Greg is the author of two books about Linux kernel development, both free online, and has written many papers and articles about the Linux kernel.

Ryan Hodson is a marketer, writer, and web developer at CloudFlare and has consulted for technology companies including Atlassian and Syncfusion. Ryan's session on Git for Static Websites will explore the benefits of “going static” for everything from simple Jekyll blogs hosted on GitHub Pages to prime-time commercial marketing websites.

Emma Jane Hogbin Westby is a member of the field information services development team at United Nations Office for the Coordination of Humanitarian Affairs (UN-OCHA) and the author of the O'Reilly titles Git for Teams and Collaborating with Git. Her session on Teaching Git at last year’s conference was a huge hit, and we’re excited to welcome her back again in 2016.

Patrick Reynolds is a Git core contributor and a member of the GitHub systems team. If you’re curious about how we scale Git at GitHub, you won’t want to miss this session.

In addition to these exciting sessions, join us to hear talks by Spencer Krum (IBM), Tim Pettersen (Atlassian), Lars Schneider (Autodesk), Charles Bailey (Bloomberg), Sytse Sijbrandij (GitLab). John Haley & Hamid Shojaee (Axosoft) and Emily Xie (Wayfair).

We have plans for additional sessions, workshops, and an Afterparty at SpinNYC, so stay tuned as we roll out more information on git-merge.com and Twitter in the coming weeks. If you haven’t already, grab yourself a ticket before they sell out. We look forward to seeing you there!

Delivering Octicons with SVG

GitHub.com no longer delivers its icons via icon font. Instead, we’ve replaced all the Octicons throughout our codebase with SVG alternatives. While the changes are mostly under-the-hood, you’ll immediately feel the benefits of the SVG icons.

Octicon comparison

Switching to SVG renders our icons as images instead of text, locking nicely to whole pixel values at any resolution. Compare the zoomed-in icon font version on the left with the crisp SVG version on the right.

Why SVG?

Icon font rendering issues

Icon fonts have always been a hack. We originally used a custom font with our icons as unicode symbols. This allowed us to include our icon font in our CSS bundle. Simply adding a class to any element would make our icons appear. We could then change the size and color on the fly using only CSS.

Unfortunately, even though these icons were vector shapes, they’d often render poorly on 1x displays. In Webkit-based browsers, you’d get blurry icons depending on the browser’s window width. Since our icons were delivered as text, sub-pixel rendering meant to improve text legibility actually made our icons look much worse.

Page rendering improvements

Since our SVG is injected directly into the markup (more on why we used this approach in a bit), we no longer see a flash of unstyled content as the icon font is downloaded, cached, and rendered.

Jank

Accessibility

As laid out in Death to Icon Fonts, some users override GitHub’s fonts. For dyslexics, certain typefaces can be more readable. To those changing their fonts, our font-based icons were rendered as empty squares. This messed up GitHub’s page layouts and didn’t provide any meaning. SVGs will display regardless of font overrides. For screen readers, SVG provides us the ability to add pronouncable alt attributes, or leave them off entirely.

Properly sized glyphs

For each icon, we currently serve a single glyph at all sizes. Since the loading of our site is dependent on the download of our icon font, we were forced to limit the icon set to just the essential 16px shapes. This led to some concessions on the visuals of each symbol since we’d optimized for the 16px grid. When scaling our icons up in blankslates or marketing pages, we’re still showing the 16px version of the icon. With SVGs, we can easily fork the entire icon set and offer more appropriate glyphs at any size we specify. We could have done this with our icon fonts, but then our users would need to download twice as much data. Possibly more.

Ease of authoring

Building custom fonts is hard. A few web apps have popped up to solve this pain. Internally, we’d built our own. With SVG, adding a new icon could be as trivial as dragging another SVG file into a directory.

We can animate them

We’re not saying we should, but we could, though SVG animation does have some practical applications—preloader animations, for example.

How

Our Octicons appear nearly 2500 times throughout GitHub’s codebase. Prior to SVG, Octicons were included as simple spans <span class="octicon octicon-alert"></span>. To switch to SVG, we first added a Rails helper for injecting SVG paths directly into to our markup. Relying on the helper allowed us to test various methods of delivering SVG to our staff before enabling it for the public. Should a better alternative to SVG come along, or if we need to revert back to icon fonts for any reason, we’d only have to change the output of the helper.

Helper usage

Input <%= octicon(:symbol => "plus") %>

Output

<svg aria-hidden="true" class="octicon octicon-plus" width="12" height="16" role="img" version="1.1" viewBox="0 0 12 16">
    <path d="M12 9H7v5H5V9H0V7h5V2h2v5h5v2z"></path>
</svg>

Our approach

You can see we’ve landed on directly injecting the SVGs directly in our page markup. This allows us the flexibility to change the color of the icons with CSS using the fill: declaration on the fly.

Instead of an icon font, we now have a directory of SVG shapes whose paths are directly injected into the markup by our helper based on which symbol we choose. For example, if we want an alert icon, we call the helper <%= octicon(:symbol => "alert") %>. It looks for the icon of the same file name and injects the SVG.

We tried a number of approaches when adding SVG icons to our pages. Given the constraints of GitHub’s production environment, some were dead-ends.

  1. External .svg — We first attempted to serve a single external “svgstore”. We’d include individual sprites using the <use> element. With our current cross-domain security policy and asset pipeline, we found it difficult to serve the SVG sprites externally.
  2. SVG background images — This wouldn’t let us color our icons on the fly.
  3. SVGs linked via <img> and the src attribute — This wouldn’t let us color our icons on the fly.
  4. Embedding the entire “svgstore” in every view and using <use> — It just didn’t feel quite right to embed every SVG shape we have on every single page throughout GitHub.com especially if a page didn’t include a single icon.
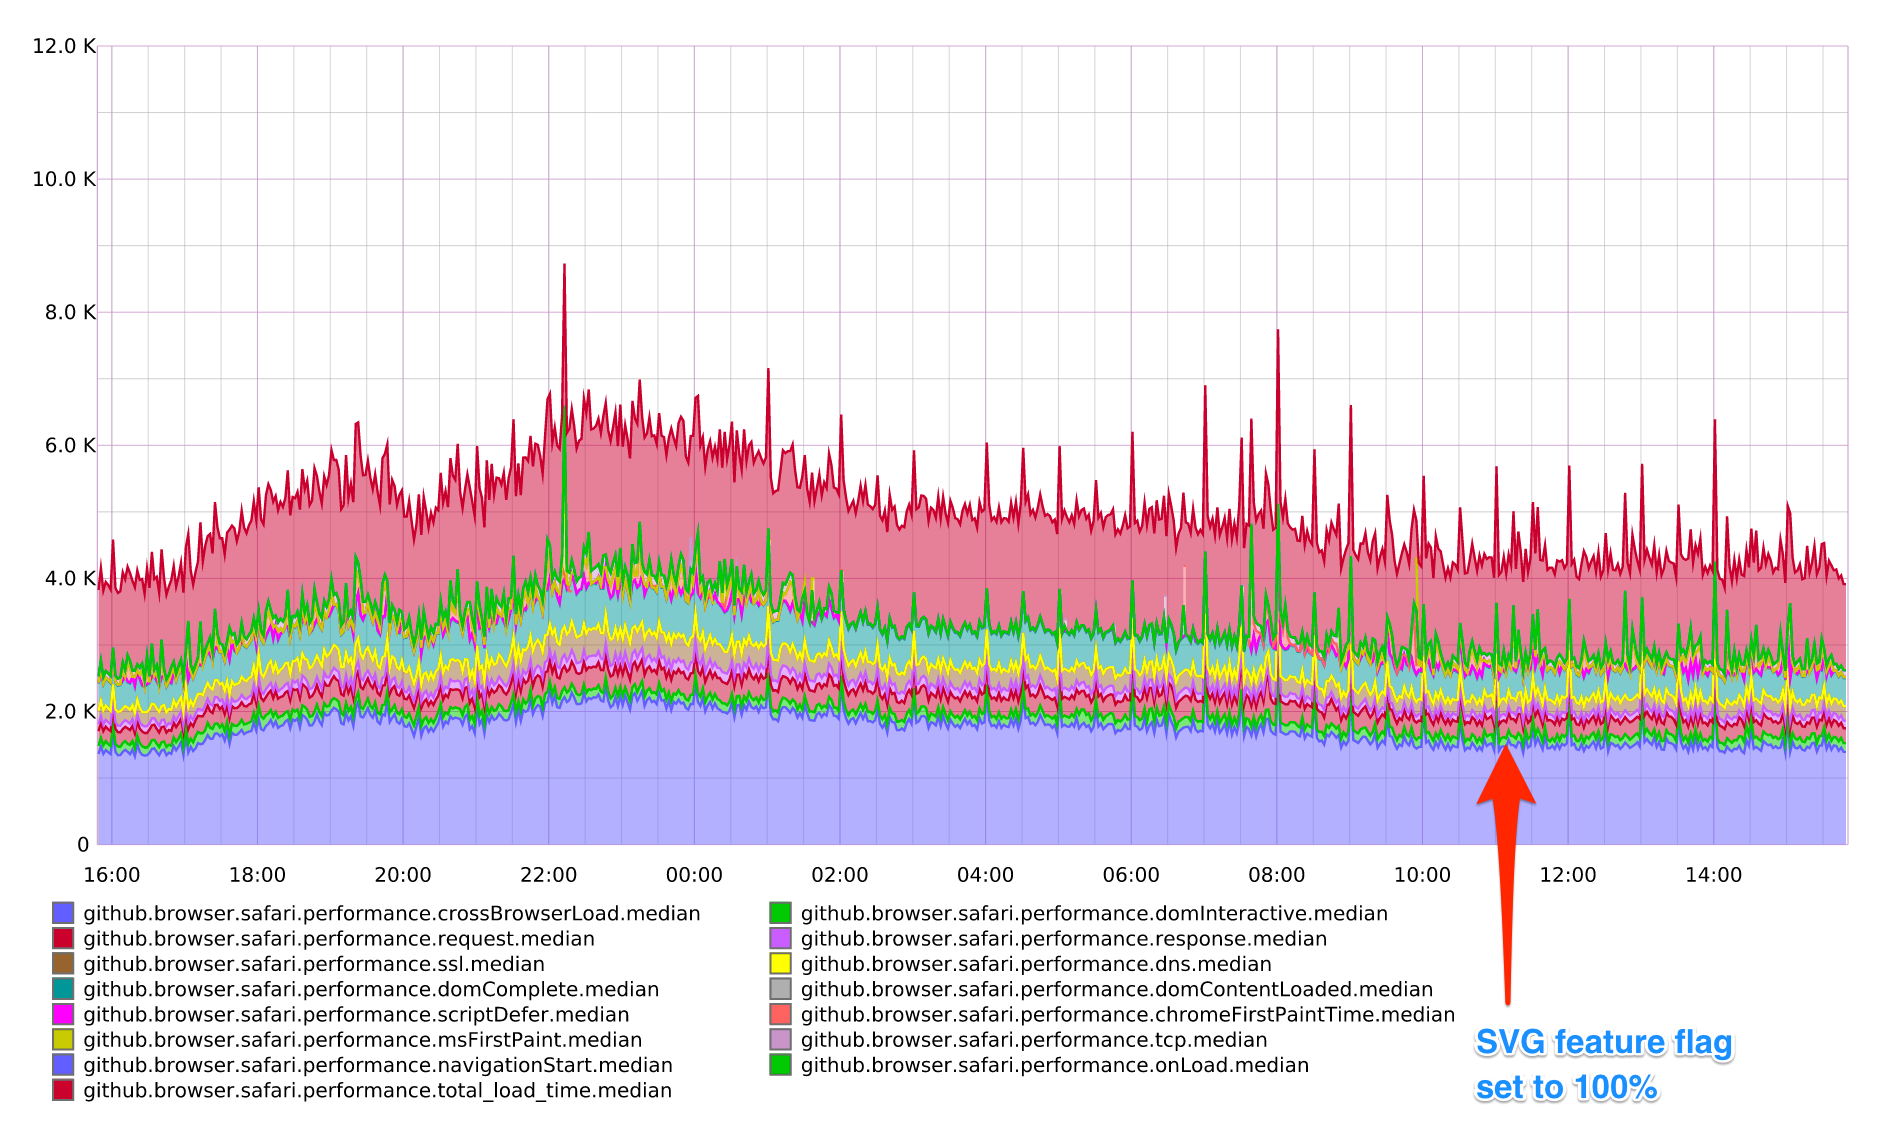
Performance

We’ve found there were no adverse effects on pageload or performance when switching to SVG. We’d hoped for a more dramatic drop in rendering times, but often performance has more to do with perception. Since SVG icons are being rendered like images in the page with defined widths and heights, the page doesn’t have nearly as much jank.

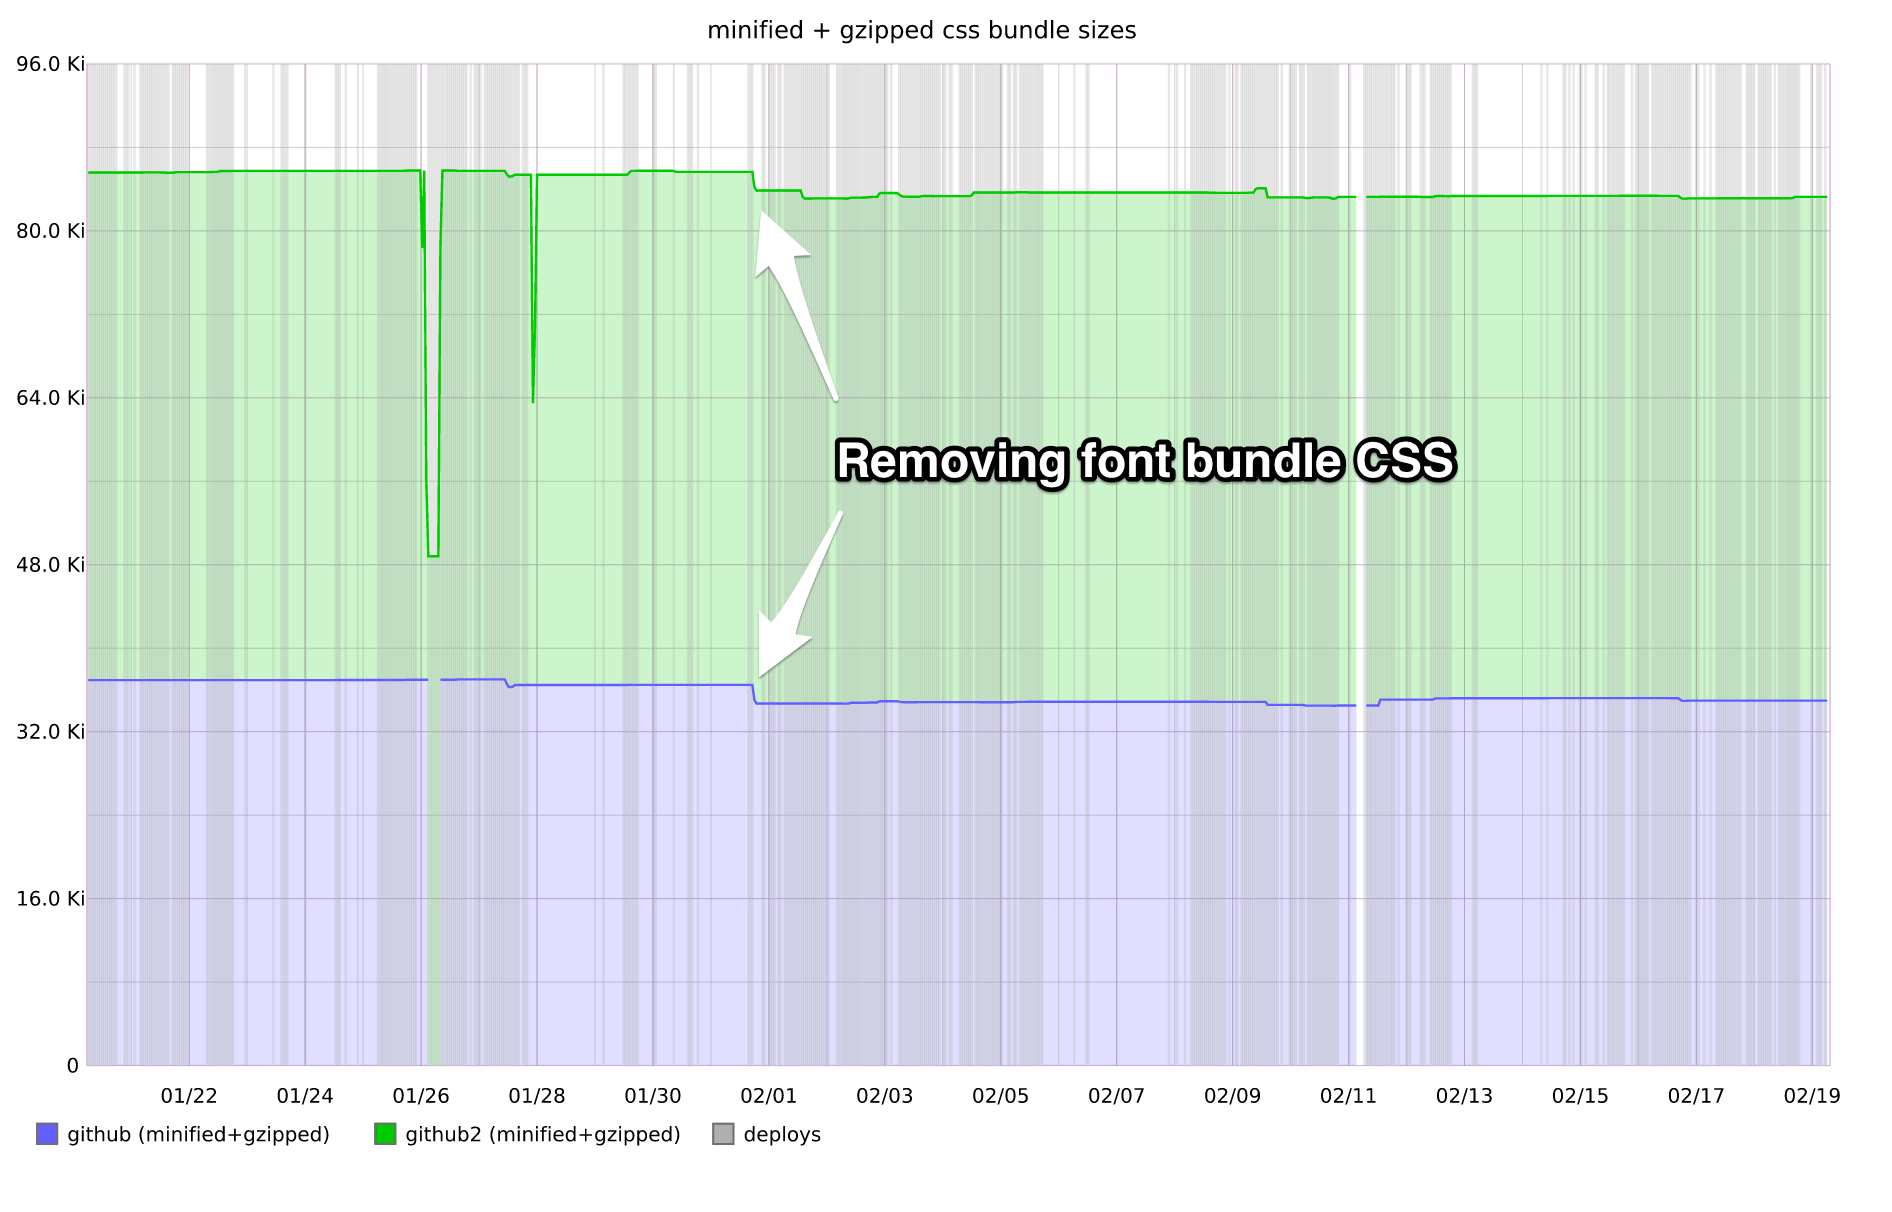
We were also able to kill a bit of bloat from our CSS bundles since we’re no longer serving the font CSS.

Drawbacks & Gotchas

  • Firefox still has pixel-rounding errors in SVG, though the icon font had the same issue.
  • You may have to wrap these SVGs with another div if you want to give them a background color.
  • Since SVG is being delivered as an image, some CSS overrides might need to be considered. If you see anything weird in our layouts, let us know.
  • Internet Explorer needs defined width and height attributes on the svg element in order for them to be sized correctly.
  • We were serving both SVG and our icon font during our transition. This would cause IE to crash while we were still applying font-family to each of the SVG icons. This was cleared up as soon as we transitioned fully to SVG.

TL;DR

By switching from icon fonts, we can serve our icons more easily, more quickly, and more accessibly. And they look better. Enjoy.

Upload files to your repositories

You’ll soon be able to skip the command line and upload files directly to your repositories without having to leave the browser. Repository uploads will be rolling out over the next few days, so if you can’t upload yet, sit tight.

You can click the “Upload files” button in the toolbar at the top of the file tree.

Upload files button

Or, you can drag and drop files from your desktop onto the file tree.

Repo upload drag & drop animation

Once you’ve added all the files you want to upload, you can commit them directly to your default branch or create a new branch and open a pull request. This will look familiar if you’ve used the “New file” button before.

Check out the documentation for additional information on the feature.

This should make simple file additions a little quicker for new and experienced users alike. Enjoy!

Issue and Pull Request templates

It's hard to solve a problem when important details are missing. Now project maintainers can add templates for Issues and Pull Requests to projects, helping contributors add the right details at the start of a thread. This is the first of many improvements to Issues and Pull Requests that we're working on based on feedback from the community.

screenshot 2016-02-17 10 51 37

To add an Issue template to a repository create a file called ISSUE_TEMPLATE in the root directory. A file extension is optional, but Markdown files (.md) are supported. Markdown support makes it easy to add things like headings, links, @-mentions, and task lists to your templates.

Pull Request templates follows the same pattern: add a file called PULL_REQUEST_TEMPLATE to the root directory of your repository.

If you're worried about the added clutter in the root directory of your project, we also added support for a .github/ folder. You can put CONTRIBUTING.md, ISSUE_TEMPLATE.md, and PULL_REQUEST_TEMPLATE.md files in .github/ and everything will work as expected.

Check out the documentation for additional information on the feature.

Something went wrong with that request. Please try again.