Welcome to OpenBuilds Community

Signup today and join in on the fun!

Sign Up

Lautr3k

Discussion in '3D printers' started by skarab, Jan 7, 2014.
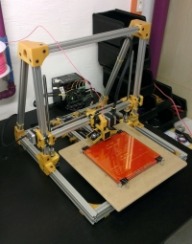
  1. skarab

    skarab Veteran Builder

    Hey @carl when you are done, I would like to add your videos on the build manual.!?
    @abazabba It is with joy :)

    @all the only thing i want in return is pictures ,videos and fun :) feel free to edit the wiki with your comments, tips, photos, videos, improvement, etc ...
    carl likes this.
  2. carl

    carl Journeyman Builder

    sadly! I have got to save up the money for the 10 start 25mm pitch fast lead screw and nut, and Acme lead screw and nut, I think ill have it in about a month :-( ...oh thank you skarab plz add what you like, I put them there for you anyway, if your going to add my videos to the build manual I best try to make better ones from now on :))
  3. carl

    carl Journeyman Builder

    ok im ordering my 10 start 25mm pitch fast lead screw and nut, this monday coming the last parts i need :)
    skarab likes this.
  4. ronniebelmar

    ronniebelmar Well-Known Builder


    My Y carriage is very unstable. Still tweaking the unit
  5. Carlos Fernandez

    Carlos Fernandez Well-Known Builder

    Thank you, thank you, thank you, OpenBuilds and Skarab! I have been waiting for this printer. It is going to be better than anything out there at this consumer level. I maintain and use regularly a Thing-O-Matic clone for a school. It works but slow and precision is lacking. I have parts coming and am excited to start the build. Trying to save money I will be using a 3/8-8 4 start for x and y. My daughter saw it and wants to make a chocolate extruder for it. I told her "You design it and build and we'll see what it will do". Thanks for the learning experience. Priceless!
    Last edited: Mar 9, 2014
  6. ronniebelmar

    ronniebelmar Well-Known Builder

    well I am the guy that bought the kit. Overall not happy with seller. Y carriage print quality was horrible. Its twisted. Also missing parts and hardware. Told me will send new carriage. We will see.

    But I love this unit! One problem I am having is calibrating the x axis. It overshoots every test print. it will print fine the first few layers. i thought it was miss stepping but I check the motor current and it fine. Any suggestions?
    Last edited: Mar 9, 2014
  7. skarab

    skarab Veteran Builder

    I hope the seller gonna fix his mistakes! keep us informed of the outcome.

    If the current is set to the correct value, it is probably too much acceleration. Start with 1000mm / m and gradually increase in increments of 100mm / m.
  8. ronniebelmar

    ronniebelmar Well-Known Builder

    I thought it might have to much resistance in the carriage. I am able to spin the screw at the coupling with my thumb and forefinger and traverse the whole way. Towards the end about 200 mm away it get tighter but I can still spin it. Any thoughts?

    I will play with acceleration.
  9. ronniebelmar

    ronniebelmar Well-Known Builder

    sorry still new to this. Is there a way to read and change the firmware on the arduino? It has Repetier 0.83 firmware and I don't know all the settings. No configuration files was included. I want to change the acceleration.
  10. skarab

    skarab Veteran Builder

    In Repetier Host > Config > Firmware EEPROM Configuration : X-axis acceleration [mm/s^2]

    If you want, you can download and reinstall the firmware, http://www.repetier.com/documentation/repetier-firmware/rf-installation/
    But you must reconfigure all ... I advice you to keep the injected firmware by the seller and ask him to send you the sources with the current configuration.
  11. skarab

    skarab Veteran Builder

    Impatient to see the start 8 3/8-16 help print chocolate :p
    where you buy the screws ?
  12. ronniebelmar

    ronniebelmar Well-Known Builder

    I guest EEPROM set to zero. get Error: No EEPROM support compiled.
  13. Carlos Fernandez

    Carlos Fernandez Well-Known Builder

    Me too.
    McMaster.com, I will cut and machine the ends. The nuts from dumpstercnc.com.
  14. ronniebelmar

    ronniebelmar Well-Known Builder

    I really had to slow acceleration down but.....FIRST SUCCESSFUL BUILD!!! so far :)

    Attached Files:

    Robert Hummel likes this.
  15. ronniebelmar

    ronniebelmar Well-Known Builder

    still needs some twerking!!

    Attached Files:

    skarab, carl and Robert Hummel like this.
  16. abazabba

    abazabba Well-Known Builder

    this was with a .4mm height, imagine if i took the time to print it finely, to quote the SKARAB, "don't despair". I had to slow down both jerk and acceleration to stop it from popping out of the threads, no big deal on overall print speed in the end.

    Attached Files:

    ronniebelmar, carl and skarab like this.
  17. abazabba

    abazabba Well-Known Builder

    i may be able to go faster, but once it worked i moved on...

    Attached Files:

    ronniebelmar likes this.
  18. carl

    carl Journeyman Builder

    oh thanks for this hope it will save time for me when i get this far
  19. abazabba

    abazabba Well-Known Builder

  20. carl

    carl Journeyman Builder

    nice video :) ...can you share your stl on the extruder you've used on top of your printer and the stl's of extuder_flange and extrudur_body so that it fits with the E3Dv5 hot end plz ?
  21. abazabba

    abazabba Well-Known Builder

    Todd and carl like this.
  22. ronniebelmar

    ronniebelmar Well-Known Builder

    THX!!! I used your setting and got a much cleaner print. I think my extruder setting were off. Also, I need to tighten up my Y axis. It still hops around but getting closer
  23. abazabba

    abazabba Well-Known Builder

    Awesome! happy to be helpful, don't forget to ensure all the wheels spin freely, I had a stuck wheel for a while very frustrating. I had to slow the X down some more after removing the motor weight by going bowden style. Not sure if i prefer it the other way or not. I intend to add another extruder to go duel , the break out board I have for that has the capability to add two more for a total of three, but really? I have no idea why, but probably keep trying till I have all three going.
  24. ronniebelmar

    ronniebelmar Well-Known Builder

    I too want to add a duel extruder but first I am focusing on what I got. I have a need to print complex shapes that usually do not have a flat edge. I am guessing this is where support material comes into play. Anyone have any experience with this? see pix.

    I also want to add auto leveling.

    Attached Files:

  25. ronniebelmar

    ronniebelmar Well-Known Builder

    Do you use Slic3r?
  26. abazabba

    abazabba Well-Known Builder

    yes, I use Repetier host and firmware, Slic3r is built in, and works easily.
  27. ronniebelmar

    ronniebelmar Well-Known Builder

    So do I. Do you use the default settings? Is there a prefered infill?
  28. carl

    carl Journeyman Builder

  29. abazabba

    abazabba Well-Known Builder

    I have about ten different presets in slicer, starting from 0 infill to 100%, various layer heights and infill combos, the print is the guide here, if its just a thingy to hang around and impress neighbors, zero can be fine, almost everything this guy puts up prints easily in zero: http://www.thingiverse.com/cerberus333/overview
    If it's a part for the kick-ass Lautr3k you might want to go 100%, experiment, don't fear errors, they are part of the ride.
  30. carl

    carl Journeyman Builder

Share This Page